Reef Tank Blog

A workspace to plan out a beginer's salt water reef tank. NOTE: I don't monitor comments regularly

Friday, August 19, 2005

Planning Diary

(I add to the end of this article when I update, so scroll down!)

7/16 I went to my LFS (local fish store) to look for a tank, telling the owner what my plans were. I mentioned that I'd like to start off with a 50 gallon system and go from there - could I hang with it, and that I already have a 16 gallon freshwater system at home.

(insert freshwater tank pics here, after camera battery is recharged/replaced)

Much to my surprise, the LFS guy said "You know, reefs can be tricky, and you really want to avoid taking on too much at once. I'd suggest starting off with your 16 gallon tank, that way you don't have so much to take care of all at once, and if you find out you don't want to take care of it, you won't be out a lot of money." This made sense - you need 3-4 lbs of live sand per gallon of water, and the cheapest I've seen so far is $10/lb.

You can use less live sand, and propagate live sand creatures into dead sand, but more live sand is better. So, let's say I go with 1/4 of the live sand I need, that's still 12 lbs of live sand...that's $120!! OK...there's a cost I hadn't fully contemplated, but you get the picture - the LFS guy saved me a big bundle of trouble already.

Bottom line - I'm starting with my 16 gallon tank. After some calculations, I come to find out it's actually 15.698 gallons, but for my purposes 16 gallons is close enough. The only danger I can forsee is this - the consensus online is that although small systems are cheaper, because of their low water volume things can go wrong very quickly. A 10 gallon sump might not be a bad idea if I can fit it in the stand, I'll prolly endup with a 5 gallon sump.

So, I need to start thinking about things. A couple of stores sell sand bed seeding kits, and dead sand is actually quite cheap, the key being to get appropriate sized sand to be a useful environment to sand bed plants and animals.

Dead sand:
I'll talk to my LFS for this, as the thought of paying for shipping of dead sand kinda rubs me the wrong way.

Live sand seeding kits (see my DSB research):
IndoPacificSea Farms: SurfZone Live Sand Activator Plus $49.95 + s/h ($39.95 if you order something else), should kick start my dead sand. IPSF carries lots of neat stuff for later.
Inland Acquatics: Detritivore starter kit is $70
GARF: Garf Grunge live sand seed kit is $5/lb. (click on Marketing link)

OK...so that should be sufficient for the sand bed. If I get just these things, the sand bed will cost $125, but will be extremely biodiverse and likely need it's own feeding regimen.

Sump

I'm thinking a 11-12 gallon sump would help out a lot, given that the water volume of my main tank will be low due to DSB and live rock. Sump dimensions will be 22.5" wide x 10" deep x 15" tall (water height will be 13-14"), based upon the inner dimensions of my stand cabinet, and that I'll need to also install a shelf to hold tank care goodies.

Along with the sump will be an overflow box. Since this is siphon based, it will increase the overall water volume, probaly by a significant about given the current volume.

Siphon Flow Rate Calculations can be seen here, which should be useful for figuring what kind of return pump I'll need.

7/26 Sump Planning Continues:

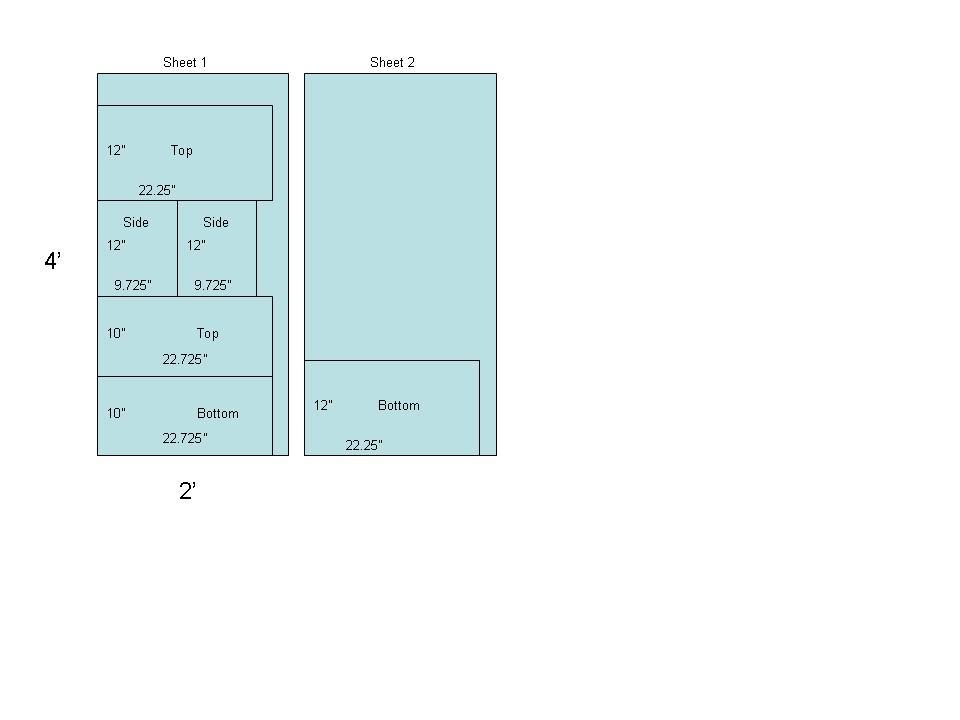
top/bottom dimensions: 22.25" (1.85') w x 9.725" (0.81') d = 1.5 ft^2 x 2 pieces needed = 3 ft^2
side dimensions: 9.725" (0.81') d x 12" (1.0') h = 0.81 ft^2 x 2 pieces needed = 1.62 ft^2
front/back dimensions: 22.25" (1.85') w x 12" (1.0') h = 1.85 ft^2 x 2 pieces needed = 3.7 ft^2

Total ft^2 of acrylic needed 8.32 ft^2, so at least 2 2'x4' sheets, and very optimal cutting!

Here's a cutting diagram. Keep in mind, the saw blade is 1/8", so I left room all around. Also, the second sheet isn't going to waste, as I'll need material for the baffles and refugium area.


8/1

After a discussion with the wife, I've come to re-realize that the reef tank is my project. The issue came up with regards to feeding - reefs need diverse food sources, and you likely can't just give them fish flakes, AND there's the issue of me not being around to feed the system.

So...I've been looking into live food sources, and how to culture them. This sure is a lot for a little 16g reef system. Maybe flake and pellet food is OK by itself? Are these sufficient for corals? Hopefully this is the case, so I can just set up an automatic feeder, and supplement with plankton as time permits.

Ultimately, I need to keep this all in perspective - this is going to be a small experimental system. I'm already getting into the realm of over-engineering it by adding a sump, but IMHO, with such a small tank, adding volume is a cheap way to better chances of success.

Setting up the reef - be sure there are some low flow and shady areas.

I read some notes about overflow rates:

"Flowrate; shoot for 800-1200gph net. Make sure you get a quiet pump. I have had good luck with Mag-Drives; seems that my Mag18 runs quieter than an Iwaki MD although it is less efficient. The Euro-Reef skimmers run more quitely than the AquaC (although I'm a big fan of AquaC)."

from this thread on the BAR forum on reefcentral.

8/2

I got an interesting idea today...since I'll be setting up a small tank, and the area where it will sit has room, why not set up a stand next to the main tank, and put the sump/refugium there? I mean, everyone seems to want to hide all the stuff that makes the main display tank look nice, while I really like the "building an ecosystem" aspect of this hobby...so why not show the whole system off?

To date, I've done no research on lighing. Here's a great forum thread.

More lighting articles:
http://www.reeflightinginfo.arvixe.com/
http://www.cnidarianreef.com/lamps.cfm
http://www.advancedaquarist.com/iss...003/feature.htm


Along those lines, I need to start thinking about corals and critters, cuz lighting will be key, especially for the corals.

Good Beginning reefing thread. <--- this is the new reef tank bible! 8/3 Here's a killer forum on raising live food.


8/8

In addition to cocepods, raise amphipods as well!

Here's a link to an article from DT, one in what looks like a very good series on raising live food.


8/19

I started a thread on ReefCentral and soon learned about another piece of the reef tank ecosystem - a "cryptic" filtration portion. Search on Tyree cryptic zone filtration for more info.

Basically, this is a portion of the system that's specifically designed to allow spunges and "sea squirts" to propagate. These creatures apparently remove the need for protein skimmers, and remove all sorts of harmful stuff from the water.

In my RC thread, SharkDude said he had a cryptic zone in his refugium. Basically, and area with live rock, and very low light.

7/22/06

Refugium Macro Algae - consider using Chaetomorpha Macro Algae - it doesn't go sexual like caulpera, and forms dense foliage, which is nice for raising amphipods, copepods, and mysid shrimp

Monday, July 18, 2005

Tank Hardware, Contents


Solution Grounding - protecting the tank and inhabitants from house induced current surges. You can't just drop a copper wire in there...copper will corrode and enter the tank ecosystems, which is not good. Titanium isn't corroded in saltwater, so be sure the ground is Ti.

Dosing/top off Pump - Dosing pumps come in electric or gravity-fed models (much cheaper). The electronic fluid doserscan very easily be programmed to control the precise daily dosing of fertilizers, two part supplements, trace elements or to top off water due to evaporation. They can be located at the same level as the aquarium, above or even below the level of the aquarium. The gravity fed containers can be used for dosing supplements such as kalkwasser or can be used for water top off due to evaporation - these aren't as slick as the electrics, but appear to get the job done (the Kent Marine gravity dosing system looks nice).

Chiller - use in conjunction with a heater to maintain water temp in a specific range. In the winter the current tank gets on the cool side, 75 degrees, and in the summer it can exceed 86 degrees...TOO HOT for reef systems. I think a 10 degree delta over a year is OK, but the hot is too hot...and I'm not about to run the house air conditioner just to keep the fish tank cool. CHILLERS AREN'T CHEAP.

Controller - This is a nice to have, as the monitoring functions can be carried out by hand. However, given my schedule, a controller might be a must have. Not cheap, most are for measuring individual levels only - PH, Calcium, Conductivity, Temperature, ORP, seem to all be separate devices, and none are cheap. "All In One"'s are $500-$700!

Filter/filter media - Many types available, for a variety of price ranges. I've notice a lot of DIY articles for wet/dry trickle filters, which appear to be considered very good filters. Given that I want to use a DSB for biological filtration, some thought should be given to the filter. Bio filter media tends to produce nitrates due to the bacteria on the media, whereas nitrates produced in a DSB are consumed by other DSB critters. Research!

Heater - Don't just get a Petco special...something fairly controllable is needed, esp given the expense of the tank, and eventually, the inhabitants.
  • Work on using about 2W/gal to raise the tank temperature 5 degrees F above the room temperature. (Thus for a 55 gal. tank you would need ~ 300W to raise the temperature to ~ 75 F if the surrounding temperature is ~ 60 F).
  • It is better to use two or three smaller heaters than one large one.
    • If a smaller heater fails on, it is unlikely to boil your tank, and if it fails off the other heater can still supply some heat until you (hopefully) discover the problem.

Hydrometer - needed to at least measure salinity of tank and water to be added to tank. These can be pretty cheap, but it may be worth getting one that monitors tank salinity on a constant basis.
  • get a good glass one, and know for what temperature it's calibrated for

Lighting - This will be a biggie...need to research...in terms of cost. Also many coral species use photosynthesis and food capture to survive, and I'll need to consider future additions to the tank as it and I mature and take on more difficult species. Research!
  • live rock needs at least 2.5-3.0 watts/gallon, preferrably more
  • soft corals (easy ones) need at least 3.0-4.0 watts/gallon, preferrably more
  • hard corals, clams, anemones need at least 6.0-8.0 watts/gallon, preferrably more
  • Water depth affects watts/gallon, since light needs to travel to be bottom of the tank through water
  • Light fixture should be able to accomodate the high light outputs for later on!
  • Color temperature is another factor - 10K is recommended for "normal" depth reefs

Live Rock - 20-40% of total tank volume in live rock, as it's essential for long term stability.
  • GARF has a great section on making your own live rock, but for my own nano reef, I think it's a bit much.


Maintenance items - salt, algae scrapers, gloves, critters. Need to do some homework here, esp. with the critters who will maintain the tank.

Overflow box - If you don't have your main tank drilled to move water into other items (sump, wet/dry filter, refugium) an overflow box is a nice way to do this. There may be DIY plans for these...they look fairly straight forward, especially the siphon based models.

Sump - A Should have - it's a good place to add water, chemicals, control water temp, monitor water properties, and it increases the water volume of the overall system.

Refugium - A Nice to have - I like the whole ecosystem aspect of this hobby, so a refugium is a nice way to get more diversity into the whole system, as you can house species that might be incompatible with main tank species, fill it with plants that can carry out other functions, etc. Could this be a DIY?

UV/Ozone water sterilizer - hrm...not so sure about this. Maybe for conditioning water to add to the system? Do I really want to kill off all the microcritters?

Plumbing - I really need to research this, as there are many parts to the system that need to be connected...at a minimum there's the main tank and a sump/refugium.

Protein skimmer - Many sources say these are very important as they remove organic stuff from the system. However, other sources that use a lot of natural parts in their systems, such as a DSB, and sea grasses in a refugium, say there's no need, as the natural parts thrive on the organics in the system. Skimmers aren't cheap...
  • Many sources indicate that this is very important in all but the smallest tanks. Lots of good DIY's on this below.

Powerheads - I'll need these at a minimum to simulate surge in the tank, more research is definitely needed.

Pumps - I'll certainly need at least one if I have a sump - I can use gravity in one direction of flow with a siphon, but the other direction will likely require a pump of some sort. Is it possible to use siphoning in both directions?
  • buy a good return pump if you're using a sump, as well as a couple of extra powerheads
  • Wavemaker/surge device is nice to have, but not essential

Reverse Osmosis - I'll likely need one of these systems to purify the water I introduce into the system.
  • RO is considered to be enough, RODI is best, but considered overkill and expensive.
    • On the other hand, you're gonna spend money on the critters...
Sea Salt - Research before you buy!! You'll need plenty on hand for water changes (10-20% every 2-4 weeks).

Substrate - see DSB section in this blog.

Tank itself - pre drilled overflow is highly recommended, as they can't go wrong like a siphon overflow!

Test kit - this could be a cheap replacement for the automatic probes above...more labor intensive, but WAY cheaper.

Thermometer - obviously needed, altho with the right heater and chiller, a thermometer will simply let me know what the temp is at any given time, as opposed to controlling the temp.
  • Get a good one, accuracy is impoortant; stick on ones won't cut it.

Wavemaker - Use in conjunction with powerheads...creating simulated ocean surge in the tank is important.

Wet/Dry filter - see Filter above.

Tank Hardware Suppliers:

Marine Depot - higly recommended and very complete
Kent Marine - Carries chemicals, has nice "Kent University" that discusses lighting in saltwater tanks


DIY Resources:

OzReef
Hawiian Fish
SnailMan's DIY
GARF's Bullet Proof Reef

System So Far


Quantity Item Cost

1 16 gallon tank inner dimensions 19.625" w (front) x 10.125" l (side) x 18.25" h (tall) FREE
1 tank stand w/ cabinet; inner cab dimenstions 22.5" wide x 10" deep x 23.25" tall FREE
  • depth can be increased by cutting out back, by another 6", but only in middle


Total Cost $0.00

Friday, July 15, 2005

Deep Sand Bed

Life in bed
Variety is key
Indo Pacific Sea Farms
Inland Aquatics
GARF

Surface dwellers (eat stuff on the surface, deposit onto surface): small harpacticoid copepod, small seed shrimps or ostracods
Upper sediment creatures (important cuz they deposit materials into the substrate): Fireworms, Nassarius snails, burrowing anemone, Phyllochaetopterus worms, cirratulid hair worms and the tube dwelling spaghetti worms,

Depth
4-8", deeper is better...4" is minimum. Approx. 3-4 lbs of substrate/gallon, altho this errs on the side of a deeper sand bed..

Content

Oolitic sand
  • 70-85% 0.5mm - 0.063mm fine sand/silt (0.125 mm seems to be happy medium); this is where the micro critters make their homes and go about life.
    • 40% 0.125 - 0.625 mm
    • 30% 0.125 - 0.25 mm
    • 15% 0.25 - 0.5 mm
  • 10% 0.5 - 1.0 mm
  • 5% > 1.0 mm
  • All the fuss on grain size is here, IMHO, just get ffine sand and mix with 5-10% bigger stuff.
  • In nature, silty sediments seem to house the largest numbers and variety of substrate life
Avoid crushed coral, coral gravel, as these are too coarse and sharp - can damage DSB life

Shimek doesn't recommend dead rock platforms for live rock, whereas some others do. I think that if you're going to have burrowers, the platforms may be helpful, altho Shimek recommends simply embedding live rock deep into the sand bed...which may ultimately prove to be better for burrowers, since they'll have a built in "ceiling", and risk of collapse is lower.
Even so, if a burrower is motivated, it could conceivably dig too deep and cause a rock to tip over, even if embedded.

Feeding DSB
For a 45 gallon tank, 1-2 tblsp thawed frozen plankton, diced fish, krill per day.

How To's for DSB

Tank Cycling

from "So you want to start a marine tank" which is from ReefCentral, a great site.

The term "cycling" is actually a bit of a misnomer, IMHO. In our hobby, it usually refers to a state where the aerobic component of the filtration system has "matured" to such an extent that there are enough aerobic bacteria present in the system to convert the ammonia/um generated by the tank's bio-load into nitrite, and the further conversion of the nitrite into nitrate. In actual fact, this only completes of the first phase of the actual nitrogen cycle.

Until a few years ago, that was as far as the process could go, resulting in a slowly increasing level of nitrate, which could only be reduced by partial water changes. Thanks to the "discovery" of live rock, and later of live sand, the "'cycle" can now be completed by anoxic bacteria living in these substances, further converting the nitrate into inert nitrogen gas.

In hobbyist’s terms, a new system is considered to be "cycling" when there are still detectable levels of ammonia/um and/or nitrite in the water. A system is considered to have "cycled" when these levels drop to zero, and the nitrate level starts to increase.

The important thing to remember is that a tank does not "cycle" only once. The system will reach equilibrium, where there is enough aerobic bacteria living in the filters to maintain an undetectable level of ammonia and nitrite with a given bio-load. Any increase in the bio-load, such as when a new fish is added to the tank, will upset this equilibrium, by "flooding" the system with more ammonia/um than the bacteria can digest. Obviously, with more "food" available for these bacteria, they will multiply (assuming that food was the limiting factor), and in time the system will reach a new equilibrium, able to handle this increased bio-load. This does take time, though, and in the meantime the increased level of ammonia and/or nitrite could be poisoning all the fish.

How to "Cycle" a new tank.

In order to "cycle" a new set-up, one must introduce a source of ammonia/um. In the past, this was usually done by adding some hardy fish (usually Damsels) to the new tank. Although this works very well in a bare tank (with outside filtration), it’s not recommended for two reasons:

    • It is cruel to keep any fish, no matter how "hardy" in water containing near toxic levels of pollutants.
    • Damsels are very aggressive, and once the tank has "cycled", they consider the whole tank as their exclusive territory. They will attack, and possibly kill, any new fish being introduced to the tank. To make matters worse, the rock in a typical reef tank makes it hard, if not totally impossible, to catch them when you eventually decide to replace them.

I would start the cycling by initially only adding the sand. Let it settle for 2-3 days, with all the circulation going. Then, add one or two pieces of base quality live rock, and one or two dead prawns or cocktail shrimps (the food type, not a dead one from a LFS - that could be carrying any number of diseases!). At this time, start testing the water for ammonia daily. You should notice an increase in the reading, and after a few days, the reading should stabilise, and then slowly start to drop (this could take 1-2 weeks). At that stage, start testing for nitrite as well, and keep on testing for ammonia. You should now notice an increase in nitrites, and a decrease of ammonia. After another week or so, the ammonia level should be fairly low, and the nitrite level should have reached it's peak.

Once the nitrite level has also started to drop, you can add the rest of the base quality live rock, and once both the ammonia and nitrite levels have become unreadable low, you can then add the good quality live rock (containing many interesting inverts). This could cause another ammonia & nitrite "spike", although it will be much smaller than the first. This is not critical if you’re patient - just let the tank settle for another month or two before adding fish. This should give the macro algae and small critters on the LR time to recover, and to multiply to sustainable levels in the LR, and to migrate into the sand. During this time, you should also add some live sand, and/or some live sand "starter kits" and "reef janitors". Also, don't be concerned with the initial algae growths - it's quite normal to have some diatom, cyano, and hair algae growing as the maturation progresses.

"Cycling" a new system with uncured live rock.

Introduce the LR after the tank's been up about a week, and use it to cycle the tank. Wait at least two months before introducing the first fish.

Advantages:

  • You don't stress (or kill) any fish, and do not have to add fish that you will have to remove at a later stage.
  • You don't need to buy fully cured LR. In fact, the cheaper, uncured LR causes a better cycle, and usually have more diverse life forms in/on them.
  • You can introduce all the rock at once, do your "rockscaping", and have the tank completely set up when introducing the first fish.
  • You will have amazing growth of whatever comes on the LR - with no fish to eat them, you will get all kinds of macro algae, featherduster worms, soft polyps, even some corals, growing.
  • You will also enable the "small life", such as copepods and amphipods, to establish and multiply to such an extent that they should survive predation by your fish. Obviously, if you only have 2 or 3 of a specie to start off with, and they're eaten by a fish on the very first day, none will multiply after that.

Disadvantages:

  • You will have to wait before you introduce any fish.
  • Because the initial bio load was smaller, you will have to add your fish at a much slower tempo to avoid causing another ammonia/nitrite spike.
  • You might have some algae growing on the LR. This is usually not a problem, though, as you start off with a nutrient poor set-up, which can be easily maintained, as there are no fish to feed. Also, the growing macro algae compete for nutrients, thereby restricting the growth of nuisance algae.